Kick-out flashing
Kick-out flashing
How 50 cents of flashing makes a difference
Kick-Out Flashing: How 50 Cents Worth of Metal Can Save You Thousands in Water Damage
Repair bills for hidden water damage routinely run $5,000–$15,000 or more once mold, rotted framing, and ruined insulation are involved.
Yet the fix that prevents most of these disasters in one very common spot costs about fifty cents.
That fix is called kick-out flashing, and it’s especially critical where a roof rake terminates mid-wall. In today’s post we’ll show you exactly what kick-out flashing is, why it matters at that specific roof-to-wall junction, how it works, and what happens when it’s missing or installed wrong.
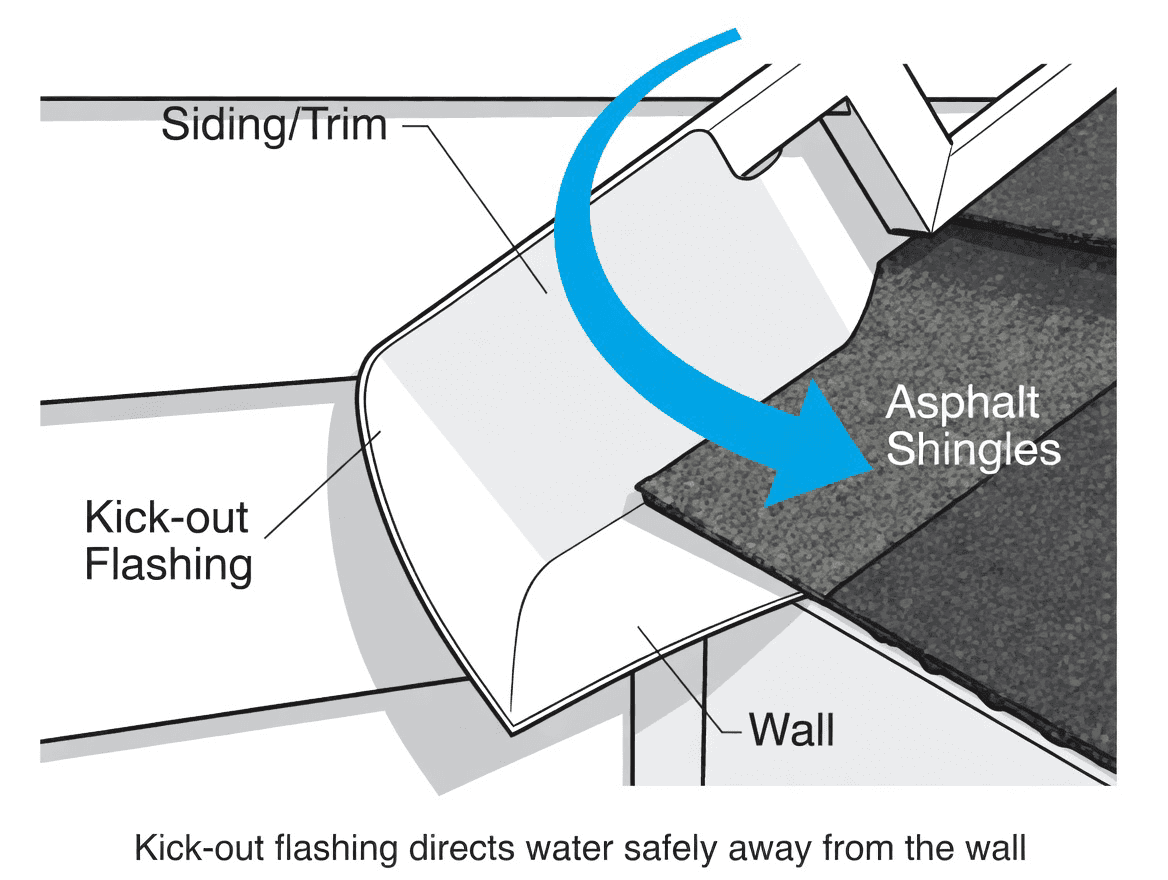
What Is Kick-Out Flashing?
Kick-out flashing is a small, L-shaped or angled piece of sheet metal (usually galvanized steel, aluminum, or copper) that sits at the bottom of a roof-to-wall intersection. Its job is simple but brilliant: it redirects water that runs down the roof slope out and away from the wall instead of letting it run straight down behind the siding.
Think of it as a tiny metal ramp that “kicks” the water off the roof edge and into the gutter or off the house.
The Problem Spot: Where a Roof Rake Terminates Mid-Wall
Many homes have rooflines that aren’t perfectly straightforward. A common detail is a rake (the sloped edge of a gable or shed roof) that ends partway up an exterior wall instead of continuing all the way down to the eaves. You’ll see this on:
Dormers
Second-story additions
Complex roof designs
Certain cape-cod or contemporary designs
At that termination point, rainwater races down the roof slope and slams directly into the vertical wall. Without a proper kick-out, the water has nowhere to go except behind the siding, fascia, or sheathing. Over time it soaks into the wood framing, insulation, and drywall—often completely out of sight until the damage is extensive.
How a 50-Cent Piece of Flashing Stops the Flood
When installed correctly, the kick-out flashing does three things:
It creates a positive slope that forces water outward.
It overlaps the step flashing or counter-flashing above it so water can’t slip underneath.
It extends past the edge of the wall so water drops clear of the siding (usually 1–2 inches).
That’s it. One small, inexpensive piece of metal, properly placed and sealed, turns a high-risk leak point into a non-issue.
What Happens When It’s Missing or Done Wrong?
We see this exact failure during home inspections all the time. Here’s the typical progression:
Year 1–2: Minor staining appears on interior walls or ceilings after heavy rain.
Year 3–5: Water reaches the sheathing and framing. Rot begins.
Year 5+: Mold growth, sagging ceilings, musty smells, and structural concerns appear.
Repair cost jumps from a $300–$600 roofing fix to a $8,000–$20,000+ interior remediation project.
I’ve inspected homes where a missing kick-out flashing caused significant hidden damage—while the flashing itself would have cost less than a cup of coffee.
Proper Installation Matters
A correctly installed kick-out flashing must:
Be installed before the siding goes on (or carefully integrated during a re-roof/siding project).
Sit on top of the roof underlayment or ice-and-water shield.
Be sealed at the wall with high-quality exterior caulk or tape.
Extend far enough beyond the wall plane so water cannot run back toward the house.
If any of those steps are skipped, the flashing becomes decorative instead of functional.
What Homeowners Should Do
If you’re building or re-roofing right now:
Ask your roofer or contractor to include kick-out flashing at every roof-rake-to-wall termination. Show them this article if needed—good crews already know it, but it never hurts to confirm.
If your house is already built:
During your next home inspection or roof inspection, make sure the inspector specifically checks every rake termination point. Look for:
Dark staining on siding directly below the rake end
Bulge or swollen cladding materials
Soft or spongy sheathing/siding when gently probed
Interior stains on the ceiling or walls below that location
Local builders
In our beach towns, we’re only now beginning to see kick-out flashing appear on new construction and major re-roofing projects. While this simple but critical detail has been standard practice — and often required by building code — in many other parts of the country for years, our region has been slow to adopt it. Many new homes still lack proper kick-out flashing at roof rake terminations, leaving homeowners unnecessarily exposed to hidden water damage. The good news is that awareness is finally growing, and forward-thinking builders and roofers are starting to include it as a best practice. Largely thanks to home inspectors bringing this to attention.
Bottom Line
Big water damage problems almost never start with big, obvious mistakes. They start with tiny, inexpensive details that were overlooked—like a missing 50-cent piece of kick-out flashing.
A competent home inspector will spot these vulnerabilities long before they cost you thousands. If you’d like us to check the flashing details (and everything else) on your home, just reach out and schedule an inspection. We’ll walk the roof and walls together and show you exactly where your home is protected—and where it might need a quick, inexpensive fix.
Stay dry in there!
— Jesse Hawk
Hawk Home Inspections